The Oakdale Hydroponic Strawberry Patch
The Farm Report 09-20-2019
 |
| Well, at least this is part of the new Oakdale Hydroponic Strawberry Patch. I thought I should give you a walk-along tour as I have been building the new system. Last time I teased that this picture of sewer drain pipe was going to be my new strawberry patch. I'm coming along, and this is how I'm making it. Maybe you will want to make one, too. |
 |
| Just so you'll know where we're going, this is the end of this part of the story. Last chapter first, as they say. I'll show you how I've drilled a lot! of holes and made ready for the water connections. |
 |
| Working outside is such a pleasure. For this project, precision isn't all that important, so I'm comfortable working on sawhorses outdoors. |
 |
| I used a 2-inch hole saw to make the big holes, then I used a 'custom ground' spade bit to make the holes for the 3/4-inch pipe threaded fittings that will carry the water/fertilizer from one tube to the other. |
 |
| There are two pipe threaded fittings in each pipe - one on each end. |
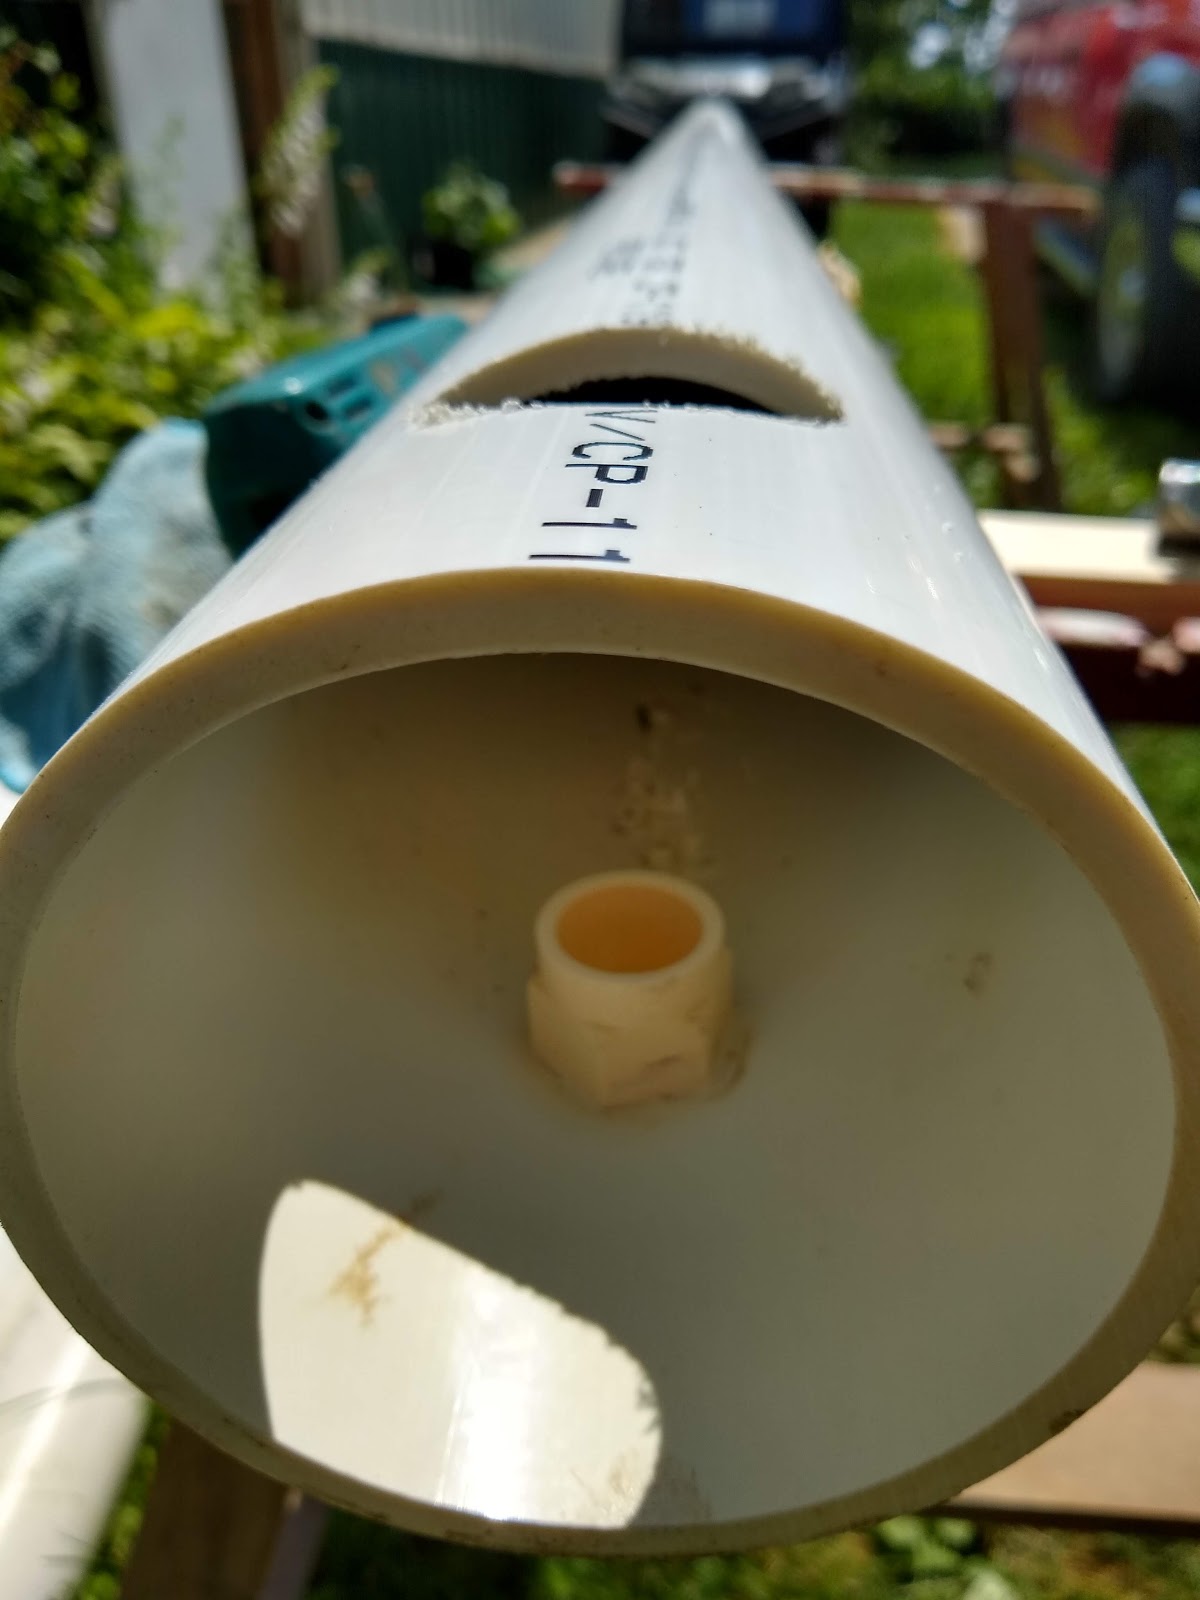 |
| After drilling and threading the holes, I screwed in a simple little CPVC pipe to tubing adapter. |
 |
| Threaded? Yep! First I had to make a threading tap. Since we're just using PVC drain pipe, a piece of iron gas pipe can make a perfectly functional tap. All you need is a little copycat ingenuity, and you're in. |
 |
| I cut off one end of a piece of already threaded old pipe that was laying around in the 'possibles' bin. Then I got out my handy dandy Dremel tool with a cutting wheel on it, and made 4 little slices down through the threads (but not all the way through the pipe) to create cutting edges and clearance slots. The bolt is a sliding 'T' handle. |
 |
| 'Taint fancy, but it works. It's all you really need to thread plastic pipe. |
 |
| See how it works. Getting the 'tap' started in straight is important. Yes! You can thread a hole crooked. |
 |
| Pipe threads are tapered. So the starter end is smaller than the last thread up on the shaft. I ground off the spade bit sides to make a hole that will just - just - allow the pipe nipple, er pipe tap, to start into the hole. |
 |
| I ran the tap down almost to the last thread. Then when I cleaned out the tap, here is the threaded hole it left behind. Perfect for our work! Remember, this is a Zero Pressure system. All that thread has to do is hold the fitting and not leak. No strength required. |
 |
| They say a pessimist is actually an optimist with experience. So I added some teflon pipe goo onto the threads when I screwed in the fittings. Belt and suspenders you know.... |
 |
| I screwed the fitting in as tight as it would go without stripping the threads. That means on-half turn from disaster, kids. |
 |
| The fitting threads stick out far enough that I can screw on a hose adapter fitting when I hook it all up. That lesson will be in another tutorial posting. More to come. |
 |
| The strawberry plants will go into these little 'net' pots. This is a 2-inch one. They come in all sizes. I've had great luck with this size. If I need a bigger size, I can re-saw the holes. It is harder to make them smaller later on though. So I started with the small size first. |
 |
| The net pots fit into the big holes perfectly. There is a little rim on them so they won't fall through. See how I have a little stand pipe pushed into the fitting? This controls the eventual height of the water/fertilizer mix that will be flowing inside. With this little temporary standpipe in place, I can raise the water all the way up to touch the bottom of the net pot where the baby roots will be. Once the roots take off, I'll pull out the standpipe and lower the water to the top of the fitting. A pump pushes water/fertilizer through the system for about 1/2 hour every 4 hours. |
 |
| Annie wasn't a big help on this job, but she did fend off the evil spirits - or better known as The Jerk III and his tribe of hens. He's becoming a pain. Soup duty can't be far away for him, methinks. |
 |
| One of my boys explained to me one time that the basic sex manual is really pretty simple. He said it should just be a flyer handout instead of a book. 'All it needs to say,' he said, 'is 'Insert, thrust, repeat.' The rest is a refinement on the original theme.' Kids keep you humble. Similarly, I just kept drilling and threading, threading and drilling until all 6 of the pipes were cut and ready. One is up in the greenhouse for a 'fitting' so there are only 5 here. Trust me, all 6 are drilled and tapped. |
 |
| These are the stanchions that will hold the pipes. I got one painted before I remembered to get out my camera. They're both equally strong, but if I don't paint 'em now, they'll never get painted. |
 |
| They are all glued and screwed together and ready for service now. My Dad was an accomplished cabinetmaker. He gave away pencils that said, "Old cabinetmakers never die, they just fall apart at the joints." He also said that if he couldn't glue it or screw it, he didn't understand it. Then he'd grin with a twinkle in his eye and get back to work. |
 |
| Out in the orchard, we're finishing up with the Stanley plums. They are so good. These are the last for me for this year. |
 |
| Annie likes the washing up part best. You'll probably need to zoom up the picture to get the full effect, but she's got her nose in the water - and she's blowing bubbles! She did this all afternoon. She's a water dog! Who would have thought you could entertain an Aussie/Heeler with a pan of water? Maybe I should float some apples and teach her how to go bobbin' for apples this Halloween. All is well at Oakdale Farm. I hope it is with you, too. Another time, I'll show you the whole rig set up and running. |