The Greenhouse Edition
The Farm Report 3-23-2019
 |
Or should it be 'Addition?' Here is the more-or-less completed Oakdale Farm Greenhouse. More accurately, it should be called a hoophouse or polytunnel. It is a single layer of plastic covering a wood and wire frame. The intention is to extend the growing seasons without any heat source. It isn't a winter greenhouse in the old Victorian terms. I've had several requests to show this structure and tell a little more about how I built it. So, while the seeds are busy sprouting and I have a little time, here it is! I am adding a lot of pictures this time to show the construction details for anyone interested. If you like gardening, then I think everyone should be interested. Unlike in the Victorian days when bricks and mortar and glass were involved - and lots of money needed, a poly-hoophouse-greenhouse is in the affordable range for everybody. These are essentially a hoop arched fence with a plastic sack covering it. Mine is made mostly from a little wood, some cattle panels and leftover concrete reinforcing wire. |
 |
So we begin. First, select a site. This is my 3d go at a greenhouse, so I wanted to build mine on a more permanent plan. I have lots of space, so I picked a spot on the edge of my field gardens and ran it with the long dimension going east and west. If you get started wrong, then everything else goes wrong. Establish your size based on the available stock sizes of greenhouse plastic and set the corner posts. Get 'em right, and get 'em square! If you were dozing during geometry class, the diagonal distance from one corner across to the other should be EXACTLY the same both ways. If not, make adjustments or you will hate yourself every time you make a move. Trust me. Get it square. |
 |
I used old Emmie, my 1947 Farmall M, with a post hole digger. If you don't have one, there are lots of ways to make a hole in the ground. As I recall, in the Pecos Bill stories, he was trying to make a living selling fence post holes to the public. There's lotsa ways to 'git-er-done' as they say. My posts go about 30 inches into the ground - as deep as the digger would go. |
 |
Once the corners are set, then dig in the rest. I just tamped in soil to hold the posts. Since this is in my field, I didn't want my boys - or whoever follows me - to cuss too much if they had to pull them out sometime. I used 8-ft 4X4 treated posts because they were cheap and available. They are working fine. Just set them down into the ground solidly, and don't worry about how high they stick out above the ground. All will be fixed later. |
 |
As in right now. I wanted a 4-ft high 'knee wall' effect. I'm using commonly available 16-ft cattle panels and I had figured out how much headroom I would have if I used a 4-ft knee wall height. Oh, and by the way, my floor plan is 12-ft by 25-ft long. Why 25-ft? Because for some strange reason, cattle don't work on a 4-ft plan like every other builder in the world does. Cattle like their panels to be 50 inches wide. I'm using 6 panels, so that adds an extra 12-inches, which comes out to 25-ft. |
 |
It is easier to see the cattle panels arched across the span here. TIP: These panels are available everywhere and they are cheap (under $20 each when I bought these). They are strong steel and the steel is tempered. They are big springs! On the first two, we just arched them and put them up in place. The springs kept pushing outward. On the next 4, we 'pre-bent' the panels so they wouldn't push out so much. It worked, but in my haste, I didn't take out the first ones and give them a little bend. I'm sorry about that even today. They push! Also, see the two posts that will form the door? See the boards going up to the panels? We essentially built to fit. The door frames get better later, and the rest of the posts were sawed off to correct height. |
 |
The panels are all in place here, but it ain't pretty. See how they nearly line up? To make the arch one continuous run, I joined each panel with twisted wire. How could a farmer not make something without some twisted baling wire in the program somewhere? I joined each intersection of each panel this way. In the end, I have one continuous arch with integrity from front to back, start to finish. It is strong. Very strong. |
 |
Once wired and joined, you can see the arch looks much better. Also, look at the doorway. More framing material added. I took the cutoffs from the side walls and simply added them onto the tops of the two door framing posts. They don't do much but add to the door frame, but it looks better. |
 |
The threshold pieces are just held in place with a cleat. I built them so they can be removed in the event I want to take them out and drive a vehicle inside. |
 |
You have to stand back and admire your work from time to time. Really. Getting a long distance view sometimes lets you see when unexpected things are going wrong. Or, it looks great and you breath in before quitting for the day. |
 |
The cross arch guy wires help hold the arch in the event of a snow load. More about that later! They also help the arch operate as a single structure during high winds. I have HIGH winds here. |
 |
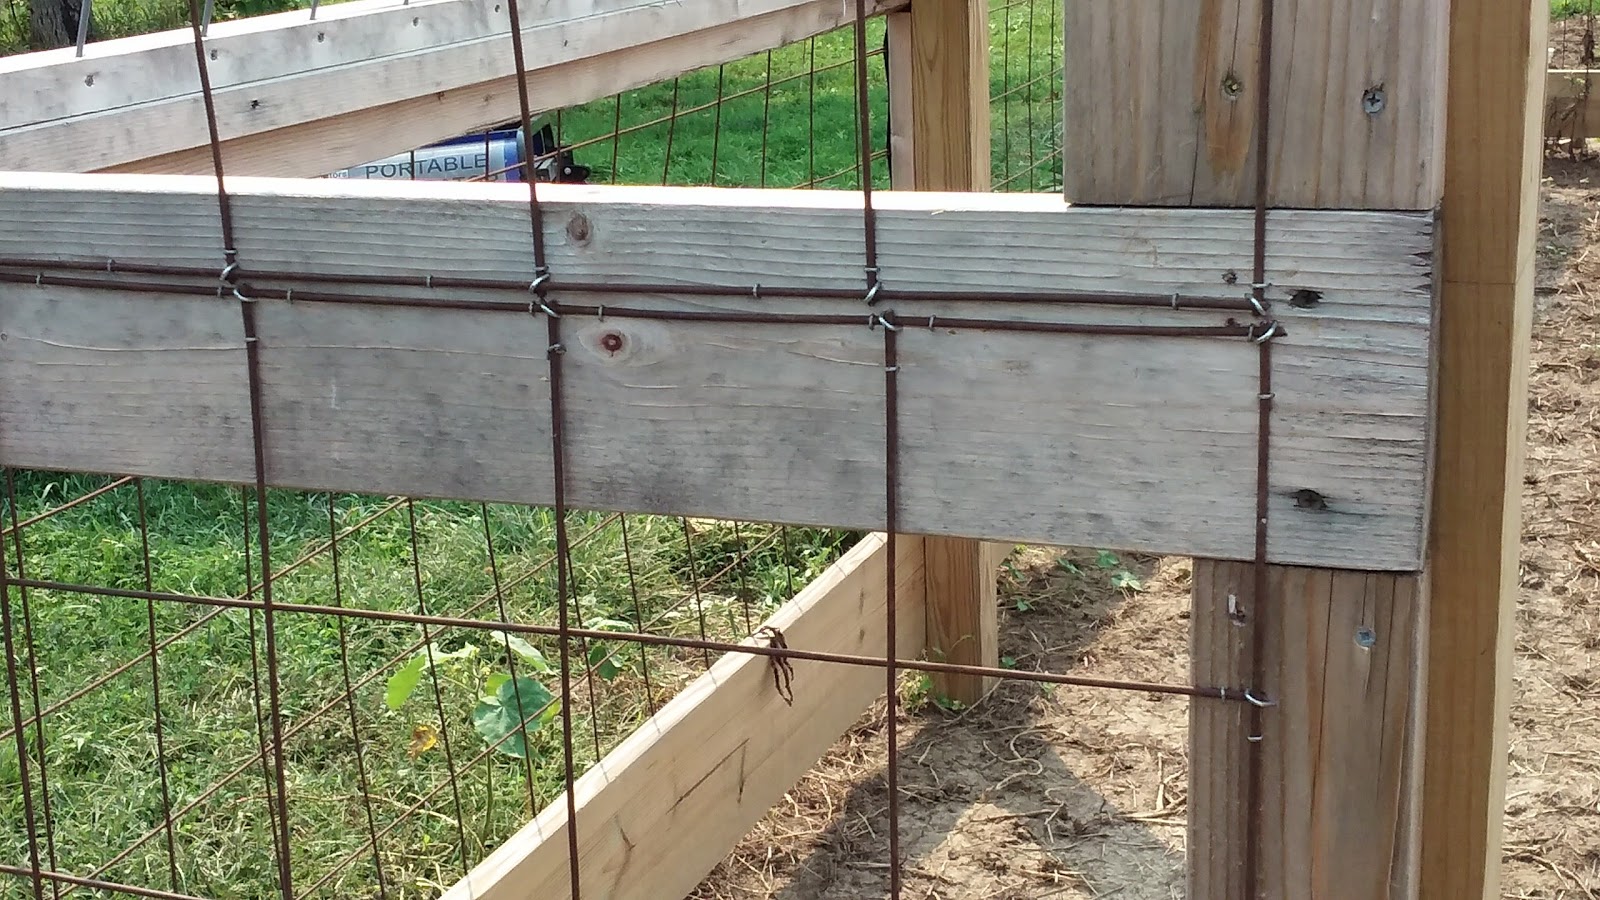
To hold the cattle panels, I just made a ledge out of framing lumber. The panels simply sit on the ledge. Since they are pushing out anyway, it works great. |
 |
Once everything was in place, I added a clincher to stop the panels from being able to lift off the ledge. Again, high wind strategy! |
 |
I added a footer rail. My drawing used 2 X 10 treated lumber. That is what you are seeing in this pic. When I got to the lumber yard, 10-inch lumber seemed huge. I questioned myself. I bought it anyway. When I was putting it on, I questioned myself again. I put it on anyway. Now that it is all done and I am using the greenhouse, I was right all along. You want a big wide footer rail to put earth up against inside and out. |
 |
More framing details around the opening. |
 |
The diagonal support members are just cut to fit. |
 |
The bottom rail is higher than the surrounding field/garden. Don't build your greenhouse so it is the bottom of a hole. You'll be walking in water if you do. You want to build one of these for yourself so you'll be so happy you could walk ON water when it is done. Make the structure a little high, and fill in later. |


 |
Most polytunnels or hoophouses don't use this drastic construction I'm using. Most are just bent tubing spaced every 4 or even 6 feet apart, and the plastic is stretched over. I live where the winds do blow! So I build for gale force storms. They happen here all the time. I had some 6X6 concrete reinforcing wire left over from another job, so I added that to give the plastic extra wind support. It is ugly, but it is really working out for me. |
 |
Although it is 6X6, that is just a guideline. The wire isn't very precise, so things don't match up perfectly. Come as close as you can and go on. |
 |
Ragged edges are just part of the bargain. |
 |
To save money and save materials, I cut in pieces where ever I could. This wire is to add wind support for the plastic skin. It isn't giving the structure any strength or integrity. |
 |
Greenhouse suppliers sell a fiber/plastic tape to help protect the plastic from sharp things like concrete reinforcing wire. It comes in black. If you don't like black, then it is a Henry Ford deal: you can have black, or black if you would rather. But it only comes in black. (OK kids: Henry Ford only sold Model T's and Model A's in black. No colors.) |
 |
Every sharp exposed edge got black taped up. |
 |
Call me Edsel if you want, but I didn't like the black. So, I painted the black tape with some brown camo spray paint from Walmart. (Edsel was Henry Ford's son. It's part of the story.) |
 |
So then we put on the plastic. I don't have any pictures of that happening because believe me, we were BUSY! when we were doing that. It was a perfectly calm day, but once we started the Wind Gods spotted us and kicked up a blow. Yikes! We laid out the huge plastic sheet on one side. Tacked it all along the bottom rail footer, then tied ropes to the opposite corners. We hurled the ropes over the arch and pulled the plastic up into place. There were 3 of us doing this. Two held the plastic, and one tacked it down to the bottom footer rail. You want to stretch the plastic tight when you put it on. |
 |
A note about the plastic. This is not ordinary 'builder's plastic' that you might get from a home supply store. This is a special greenhouse covering plastic. It costs more than the builder's supply stuff, but not that much more. The builder's supply plastic will not last 6 months in the sunlight. The greenhouse plastic is guaranteed for 5 years, and many folks say it will last even 10 years if it is supported from the wind whipping it around. I have a little baby greenhouse that has been skinned with the same plastic for 6 years so far. Greenhouse plastic is laminated with a nylon sheet in the middle to give it strength. It is also treated to resist UV light destruction. If you build one of these, use the real thing for greenhouses. |
 |
Because of the way I framed out the opening, I had to do a little black smithing on the hinges. I used common 'T' hinges and bent the long leg so the hinge pin could stick out and align with the far frame surface. I wanted my doors to be able to open and swing all the way back around during the summers. For fancy hinge pins, you'll see I used extra special pole barn framing nails. Because I had 'em. |

 |
Common gate latches are all I need for my doors. No burgelers or thieves here. I do have raccoons and 'possums and coyotes and wind though, so I need something positive to latch and hold the doors. |
 |
'And it's just that easy,' as Red Green would say. I built this project over a two year period from start to finish. I took my time because I was really building this for another person in my life who hated winter and grey days. She needed a sunny warm place to go on bad days. Things somehow didn't work out like I had planned, but what's new? We both got a lot of pleasure designing and dreaming about it though, and that's something. |
 |
Lettuce loves to grow in hydroponic basins. These corner shelves and some sweater pans from Walmart work perfectly. |
 |
Actually, those corner shelves are a sneaky way to reinforce the corners. Remember, this thing is really just a fence with a wire arch roof and a plastic bag covering over it. The shelves are glued and screwed into the corner frames as a strengthening corner support. |
 |
Bottom view, for those who care. |
 |
See the doors wide open? During the summer, that's the way they stay most of the time. It gets really hot in there! |
 |
In the winter, it gets really cold in there! |
 |
One storm was a windless, heavy wet snowfall. The arches just couldn't take it. |
 |
The snow load caused them to fail and compress inwardly. |
 |
Remember when I said these panels are tempered steel? Well they are! Once I got the snow off the top, poof! they popped right back into place with almost no damage at all. This summer, I am going to add stiffening 'joists' across the wires to help divert the snow load when it happens again. Thanks to Youtube's Norwegian gardener, I have seen how to do this. We had snow this year, they have snows like this EVERY year. Well, that's about all I can tell you about my greenhouse project for now. I hope it is helpful to you. All in all, I figure I have less than $500 total invested. If you add in for my time, then we might just as well quit and go to town. But my time was spent doing something I love to do, and it kept me off the streets and out of the bars at the same time. So let's not get into relative labor costs. Pills ain't free either, and I figure when I'm doing something like this, I won't need to take the pills. It averages out. All is well at Oakdale Farm. DECEMBER 2021 UPDATE On December 15, 2021 we experienced a 'Derecho' storm here. Winds blew steady all afternoon at up to 50 mph sustained constant speed, with gusts between 60 to 85 mph. There were some reports of 100 mph gusts. With 4-year old plastic and a bunch of good luck, I am happy to report that my little slice of protected paradise sailed through it just fine, with no damage whatever! There is something about the arched dome that defeats the wind. The wire reinforcement giving support to the plastic skin didn't hurt, either. |
Amazing and an amazing walk through of how you did it. I'ver been after a hoop house for a long time now and can't wait to get mine in the ground, it's going to be full to the brim with tomatoes this year hopefully!
ReplyDeleteYours is some serious construction, mine will just be hoops and some bracing, but I like yours. I kept looking at how to build them from scratch and if mine hadn't come along I probably would have. It's a shame we can't get the cattle panels here as so many things I have seen built in the US use them.